I have had and still have some health challenges. I’m trying to get busy at least and have had bad print adhesion problems. There are several issues going on, first of which is I am printing in a colder room, about 65F. I have moved a space heater near the printer, and didn’t help so I went back to see if the bed was still level with the colder winter like temperature. I know this is hardly winter conditions, ha ha, but something is definitely not correct.
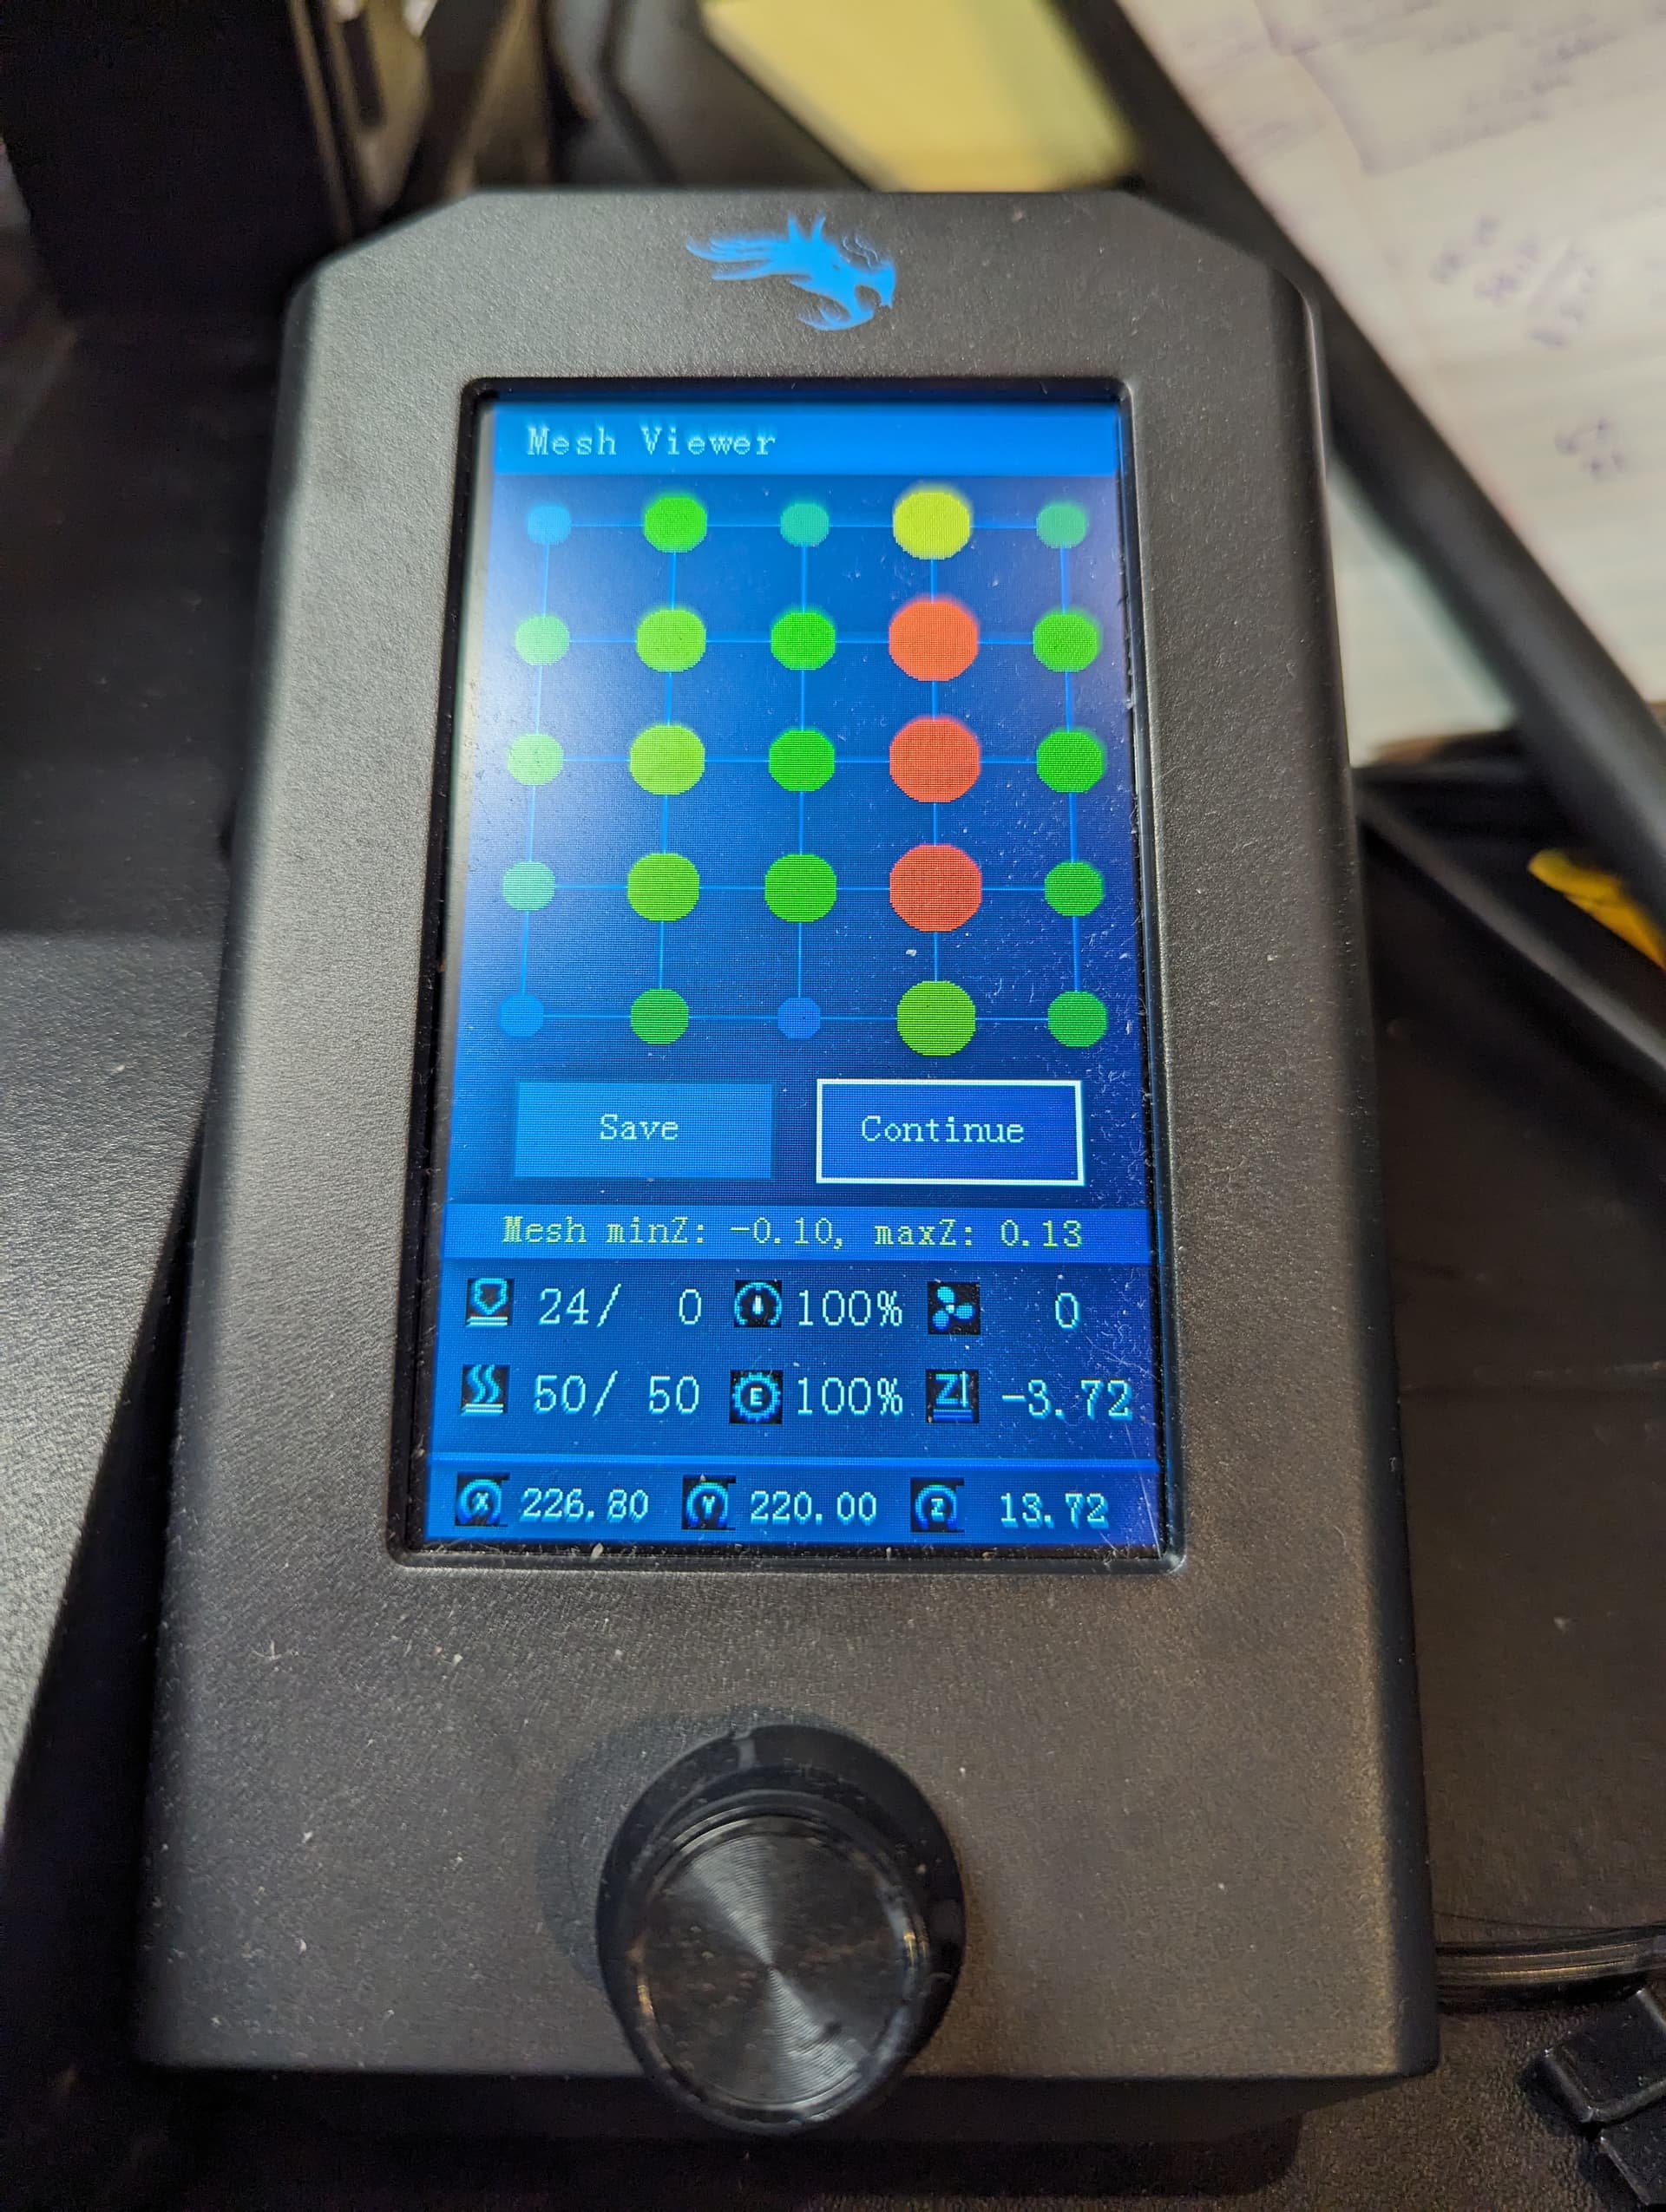
I manually leveled the corners and did a tram wizard leveling and after a few adjustments it passed. I then did a mesh level and got the following screen.
It seems along the center vertical the base is not level so I turned my print so it prints across this axis as opposed to along it. Is there a way to fix this?
Welcome back @Nefarious sorry to hear about your health issues but happy to hear your on the mend.
I don’t think the 65 degree temperature is the issue. My printers sit in an unheated room in my basement and it stays about 65 degrees during the winter and my printers are happy as a lamb. If I thought the room temp was the issue I’d turn up the bed temp 5 degrees.
I will assume your running Creality firmware but never the less that scree doesn’t look right to me. All I have see show a red or green dot at each intersection with a number in it showing how far it is off. I’m not sure what it going on with your bed leveling. My first guess would be that your leveling is fine and that the memory is messed up. First I’d try issuing a M503 this will read the setting in SRAM and list them on the screen. Your will need to do this from a console such as Prontoface or Octoprint.
M504 will viladte that the contents of the EPROM are okay.
M501 will write the setting in EPROM to SRAM
M502 will do a Factoy reset, this would be the same as when you took it out of the box. The manual bed leveling would still be good but I’d redo all the automatic leveling.
When I issue the M503 I get what looks like reasonable response, I can copy it here if it will help.
When I issue the M504 I get
Send: M504
Recv: echo:EEPROM OK
Recv: ok P15 B15
I’m not sure if you said I should do the M501, does it depend on the result from the M504?
To test the z-offest I print out a large X that is a single layer, not sure where I got it or how I decided to do it, but if I print it at the current z-offset it looks like this:
The center section is empty/very thin and very different from the outside corners. This seems to be what I would expect given the dots in the leveling screen I just sent.
I’m seeing a lot of what looks like under extrusion to me. Bump the hot end temp up 5 degrees and see if your X looks the same. If that doesn’t make a difference put a post-it note in the middle of the bed under the build plate and see what happens.
M502 does a factory reset so we don’t want to do that as of yet.
I raised the hot end up 10* to the max of what the manufacturer suggests and printed and there was even more empty space in the center.
I added one, two, and three post-it notes, they may be too big, I will measure them to be sure but they seem to be 2" on a side. Each time I calibrated the corners, only the first time did I have to make a change. After the corners were calibrated I then did the auto mesh process and printed an X.
After the three pieces of paper here is the mesh screen:
And here is the X that is printed. I played with the x-offset some, but the lower edges got very nasty so I went back to the value before I added the paper. The edges seem correct, it is just the center vertical strip that seems off.
Just from looking at the printed X, it doesn’t seem like the post it note is enough to make the difference. When I first did this test, the entire X looked really good. I am going to work at this tomorrow with a smaller post-it note to see if smaller makes a difference. Any other suggestions would be useful, I don’t mind learning.
Well, I finally got my mind working and found this is a very common problem with the Ender printers because they use a thinner build platform. The solution is to put heat tape, I have some on order, on the bottom of the build plate to make the top of the build plate more flat. I will post the result when I have finished the mod.
I do wonder if there is a mod to replace the build platform? Or if people just spend the money on their next printer
@Gramps i really want to be sure to thank you for your guidance, it is very appreciated.
I went out and got some heat tape, thinking I can level the bed using the mesh wizard. Simply put tape on the bottom of the build plate where the mesh showed it was not flat. After about 5 layers, I got the feeling this wasn’t going so well. Here is an image at the end of the process, at least as far as I took it.
You can see that I got it as flat as possible except the center never seems to change. I am having a little difficult time concentrating some times, my current health issue. I looked at the from of the build plate and I can clearly see that the top of the plate is curving up in the center, not flat or down. I flat edge ruler validates this.
So, the sensor is either defective or there is a defect in the mesh firmware. Since the bad reading is consistent, always in the same location, I am leaning toward a firmware defect.
I will see if I can find a way to clear the uploaded mesh values and see how the X prints without a mesh and then sort out the version of firmware and see if anyone else has this issue.
No I was taping the center. I just figured out where to tape from experience and really could be wrong. I can’t find a reference to the scale and color differences. I just put some paper down in the center and it made some of the surrounding points match the far outside so I figured I was adding in the correct orientation.
I then just used a metal strait edge without a feeler gauge on the build base and it appears to be very flat. I have a set of feeler gauges on order and I will measure it when they get here. The issue is, given how far off, at least that’s what it seems, of the center one should be able to visually see the gap between the base and the ruler and there isn’t one.
This is what led me to think it is either the gauge or the firmware.
Are you using stock Creality firmware if not what are you using?
At this point I would issue a M502 followed by a M500 this will set everything back to factory specs. The manual bed leveling won’t change, though you Z offset more than likely change but the probe should stop the hotend from crashing into the bed. Before doing anything else I would print your X and see what it looks like.
My startup code is very standard except I added M420 S1 Z10 to load the saved mesh.
If it helps here it is:
G90 ; use absolute coordinates
M83 ; extruder relative mode
M140 S[first_layer_bed_temperature] ; set final bed temp
M104 S150 ; set temporary nozzle temp to prevent oozing during homing and auto bed leveling
G4 S10 ; allow partial nozzle warmup
G28 ; home all axis
M420 S1 Z10; Load saved mesh from EEPROM
G1 Z50 F240
G1 X2 Y10 F3000
M104 S{first_layer_temperature[initial_extruder]+extruder_temperature_offset[initial_extruder]} ; set final nozzle temp
M190 S[first_layer_bed_temperature] ; wait for bed temp to stabilize
M109 S{first_layer_temperature[initial_extruder]+extruder_temperature_offset[initial_extruder]} ; wait for nozzle temp to stabilize
G1 Z0.28 F240
G92 E0
G1 Y140 E10 F1500 ; prime the nozzle
G1 X2.3 F5000
G92 E0
G1 Y10 E10 F1200 ; prime the nozzle
G92 E0
I am looking for a description of what the colors mean in the mesh display.
If I reset to factory, do I need to put the original display back on, assuming it would go back to original firmware?
Thanks for the clarification. I had thought from the picture that the center of the bed was higher than the corners. I do not have your printer, but maybe this article about the Ender 3 S1 Pro is useful. In it, the authors discuss what they had to do to get autoleveling to work.
I really don’t know what I expect with this. I turned on the heat in the room the printer is in and when the room is 70* i did both a tramming wizard and then mesh calculation operation. Here is the mesh layout.
It is much different from any of the above images, I added a space heater. I let the space heater fun overnight to get a uniform temperature throughout and did the pair, bed tramming followed by a new mesh calculation operation.
I haven’t tried printing at either of these two situations. I did print the X at the settings before I applied the heat and it was clear that on the bottom edge the plastic is much thinner than in the middle. I can’t tell if the top is different than the middle, at least not visibly.
@Gramps or @Alan
Not knowing what else to do I downloaded and installed the latest version of the mriscoc firmware and did the tramming wizard and then the build mesh operations. Result is the same as before, as expected, so the grade difference is in the bed, either the build plate or the heated bed.
Tell me if I am wrong, but the red area seems to be a steep drop, it seems to be significantly affecting my prints.
I thought the best course of action in the short term is to replace the build plate, maybe I should have done that in the beginning. If that doesn’t solve the issue, I will then replace the heat bed.
The test page I print is the X image in this thread.
The last print U made had the bottom of the print very thin near the vertical line where the red/ orange squares are. I will print again. I didn’t right away because the mesh seems like it is getting worse, instead of better.
I’m not a fan of the “X” style bed calibration print. I prefer to print squares over the bed leveling knobs, such as this one (link here). I think it is easier to see the impact of the adjustments to the leveling knobs with the squares. I’ve used it to level the bed of a print bed that is 325x325mm.
Did you try the autobed leveing proceedure in the All3DP article that I linked to above? Money quote: “We got the best results by running auto leveling first, then adjusting the Z offset, and then going through the manual leveling to get as many points on the bed as level as possible. We then reran the auto-leveling process so, even if the mesh is ignored, you still have a good chance at getting away with a decent first layer.” They think the problem is with the hardware and not in the firmware.
Thanks for your reply. First I have to apologize for not responding sooner. I am in the middle of a health issue that makes it difficult to concentrate, even reason things that were previously straight forward.
As an example, and why I haven’t responded sooner, the last week I replaced the firmware on my printer to the latest version of the firmware I am using. I then manually re-leveled the bed followed by using the auto tramming feature of the firmware. Everything looked good so I went to reset the z offset. In this effort the z offset turned out to be a number like -6.xx. When I finished I knew this was probably wrong, previous values were -3.xx and I thought I should recheck. But I didn’t, I just went to print my X and ground the surface of the build plane off and damaged the nozzle. This is just not how I usually am so after getting a new build plate and replacing the nozzle, decided to put the printer away until I get this medical issue resolved.
Thanks again for being responsive, I wish I would be.