My Prusa i3 Mk3+ lemon

I had nothing but problems a month after it arrived November 2022. I bough a pre-assembled one, despite that hub is fully capable of assembling one. So am I, if it weren’t for MS, me not being able to do that anymore, but just to show I know how a printer is constructed. Doing that turned out to be great, as otherwise repairs would have been costly under EU laws, as self-assembly was a big problem for warranties, they made that very clear. The printer is still under warranty, but it came from a reseller. Have to say that if he didn’t intervene, it would not have been fixed the first time.

We had 2 printers before this one, who both became useless after a series of outages. Lesson learned, the Prusa is on a battery. Nothing wrong with our electricity net, it’s designed by me, installed by hub, and legally approved. Belgian electricity laws are very strict.

First, the new SuperPinda broke down. I suddenly also had massive blobs all over the place, knocking prints off. It printed all over the place, at irregular heights. They sent a new SuperPinda. It didn’t fix it. They sent another motherboard, it didn’t fix it. It was sent back to them, it was fixed. I have no clue what they did, really, as their report was rather generic. They said I lubed too much, and on places nobody in their right mind would lube, which I didn’t. Yet, when it returned, they themselves overlubed it and I have had to wipe it 3 times in 3 months, as clumps of lube keep gathering in places they shouldn’t. See what I mean, and this on all rods by the way.

They claimed that the SuperPinda was incorrectly installed. We followed their manual and took many pics before and after, to compare to see if it was exactly the same, so what does that say, sigh? They claimed I complained about the vibration and fixed it, yet I never did. I was without a printer for 3.5 months. The first print I did after it returned had a massive clog right from the start, sigh. It was their filament, as I never used black glitter. It got unclogged with a no-clogger, luckily no disassembly needed.

I print miniatures mostly. I use PLA 99% and TPU rarely. I vary colors often and I have many colors to choose from. There is not one brand which prints without problems, but luckily some print with workarounds.

Z dropped 1 mm in height in 1 month. I have no clue if that’s normal.

The build plate hates Winkle PLA, which was my favourite filament till now. Previous printers had no issue with holding it onto the build plate. Different textures sheets obviously. Fiddling with temps and cooling didn’t help. Eryone and Kexcelled attach better, but still not perfect. I have tried other brands and it all was a flop. I am allergic to glue and hairspray, so I prefer not to use it. I do can stand tape, so taping the raft or brim is how I am now printing the last of the filaments which it doesn’t adhere. I can never print without a brim or raft. I have to keep an eye on the first layer constantly and check often. Printbed gets wiped clan daily. I have a filament dryer, which I always use on each roll.


It always starts to detach on the left, as you can see with this opaque PLA.

At 17 cm high, it gets serious layer shifts. I got advice to increase z-hop for those prints, which I will try next time I make a large print.

I still have blobs on the first layer, which knock the prints off. When blobs happen higher up in the print, I can hear the printer do a “crash detect” and go and clip the blob off by pausing the print. I had massive blobs before it was shipped back, it has improved a lot, but it’s annoying still.

I often get complete unreadable text on my screen. It lasts 2 secs, I have not been able to take a pic of it yet.

It started a print with this ultrawide blobby lines, yet the print after was perfect. Layer height was supposed to be 0.2 at first layer. I have no idea what that is.

It should be able to print at 90 speed, but anything over 75 gives me ridges, no matter how I adjust temps and cooling. This was a simple flat piece, so it should have handled 90 well.

I have to do a first layer calibration on a regular basis. It only works for a 14 days at best, then it’s way off again. 2 corner of the small slab had a small blob which got smeared out, but otherwise is the best result I can get.

First layer calibration often does not even work, as the first print after is off, despite a decent calibration.


And then, next print after, same gcode, same filament, it prints …

I had a thermal anomaly. Next print, same gcode, no problem. Pic taken after the print was stopped, because the PLA stank. Notice how it changed the bed texture to smooth as well, this happens now and then. I never print on my smooth bed anymore, as all prints detach on it.

I discovered that using Cura instead of Prusa makes adhesion much better though. Their first layer construction is different. Yet, I should be able to use PrusaSlicer, right?

I envy people who can print on their Prusa without blinking an eye. Mine is a lemon. I am currently gathering enough data to contact their helpdesk again. It has been suggested that I should swap it. Can I still? This is a disaster lemon for me. Hub, who is an IT’er (I used to be), says he waould have thrown it out the door months ago and praises me for being so tenacious. Yes, but I have cried more than once, seriously, and my grey hairs have increased.
I realize this question may sound lame, but have you double checked the actual temperature of the bed? That layer (last photo) looks sooooo strange!

1 Like

I did think of that. I actually always do, but only by touch. I know that 60 is just bearable on my hands from previous printers, and 65 is unbearable for more than 2 secs. But, it might be a good idea to check the actual values. Any type of thermometer you’d recommend? I only have the human fever kind at home.

And, I might add, the same print after that with the same PLA was normal.

I use an infrared thermometer to check mine. This isn’t the exact one I have but this one or one similar would work. Think mine came from Harbor Freight.

1 Like

Thanks! I will order one from Amazon. Just see what they deliver to Belgium.

Lately, I have been seeing this. I used to have perfect first layers, now it looks like beach sand. This is printed flat, but just look at that pattern!

Just out of curiosity have you checked your flow rate. Also have you checked to see if the esteps for the extruder are correct?

Flow rate seems OK. When I get it to print past the first layer, it’s fine. Whatever is printer then, is decent. It’s the first level that’s just often causing problems.

I thought about it the e-steps, but how to do that when I have blobs and drooling at each start? It is less than before I sent it for repairs, they said they screwed it tighter, but still. Since it once printed fine for a few weeks, at the start when I bought it, and a few weeks after the repairs, I never felt the need to check that and forgot to do it.

On a bad note: prints sometimes start on the left. I could understand if they did that always, but why sometimes. I can’t find a solution in Cura for this, something like “center origin”, but even then, why only sometimes? The machine settings are correct, I checked more than once. If I am correct, firmware sets the origin point? I was “told” to use this firmware only by their helpdesk, so I am not replacing in, as commanded.

Here is a pic of a model who sat perfectly in the middle and yet printed like this. Since the raft was wide, I just let it be and it printed well. But, why??

On a good note, I don’t have much of the filament the textured bed hates anymore. I fixed that issue by printing a raft with filament it likes, then switch to the filament I wanted to print in. Should have thought about that sooner!

More: increasing z-hop helped with the blobs being knocked into, that was a great tip.

Thanks for all the tips so far!

I don’t remember the exact terminology but I’m guessing what is happening is the print head is starting from its current position and not home. Don’t know what your startup gcode looks like but copy and paste yours to a save place and try this one

[code] ```
G90 ; use absolute coordinates
M83 ; extruder relative mode
M140 S[first_layer_bed_temperature] ; set final bed temp
M104 S{first_layer_temperature[initial_extruder]+extruder_temperature_offset[initial_extruder]} ; set final nozzle temp
M190 S[first_layer_bed_temperature] ; wait for bed temp to stabilize
M109 S{first_layer_temperature[initial_extruder]+extruder_temperature_offset[initial_extruder]} ; wait for nozzle temp to stabilize


M117 Print Starting… ; V3.0 EZABL Starting Code
M75 ; Start Print Timer and Engage Fil Sensor if USB Printing
M117 Antiblob retract…
G92 E0 ; Reset Extruder distance to 0
G1 E-2 ; Retracts filament to prevent blobs during probing
G92 E0 ; Reset Extruder distance to 0
M84 E ; Disable E Motor for probe accuracy on direct drive systems
M117 Homing All…
G28 ; home all axes
M117 Homing Z Probe…
G28 Z ; home z again
M117 Heaters Recovering…
G4 S10; wait for heaters to recover
M900 K0; LA

M117 Purging extruder…
G92 E0 ; reset extruder
G1 Z1.0 F600 ; move z up little to prevent scratching of surface
G1 X0.1 Y20 Z0.3 F5000.0 ; move to start-line position
G1 X0.1 Y100.0 Z0.3 F500.0 E15 ; draw 1st line
G1 X0.4 Y100.0 Z0.3 F500.0 ; move to side a little
G1 X0.4 Y20 Z0.3 F500.0 E30 ; draw 2nd line
G92 E0 ; reset extruder
G1 Z1.0 F600 ; move z up little to prevent scratching of surface

M117 Printing…


This is for PrusaSlicer so if your using something Cura or any non PS slicer the temp setting won't work so edit then for your slicer.

Probably won't fix the blobbing but should make it always start the print in the center of the bed as long as it's sliced that way.

I think you should check and see if you tell the printer to extrude 100mm of filament it actually extrudes 100mm not more and not less. This should be consistent across all filaments. 

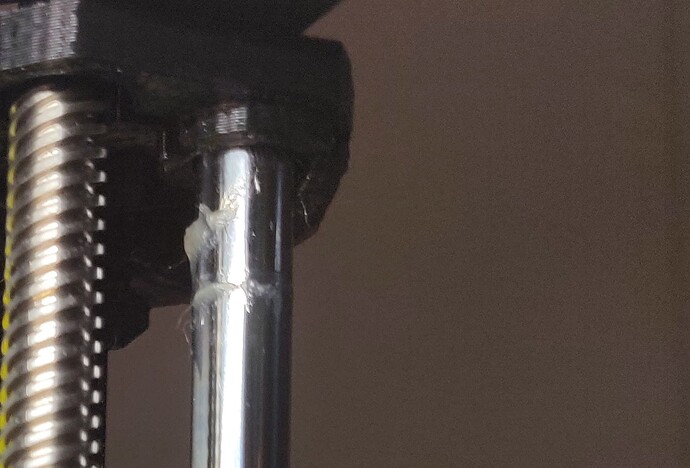
I just thought of something that happened to me that drove me nuts. The grub screw on my axis rod was loose and skipping at times, it also shouldn't be below the split in the coupler.
2 Likes

That is so awesome!!! :sparkling_heart: I will try that! My startup is the generic from Cura for my Prusa. I will compare and add the features from this to correct the startup point. I stupidly assumed that it would always be set to a correct spot. I should have known better to assume nothing, lol.

Thanks once more!! I will check the screws on the rods again after the current print is done.

Dumb question. I do not own a Prusa, but I’ve seen people post that the smooth sheet is for PLA and the rough sheet for PETG. Is that the smooth sheet?

Cheers

I have a PEI sheet that is rough on one side and smooth on the other on my Ender 3 S1 Plus and I always print on the rough side. Always sticks god as long as I keep it clean.

That is a textured sheet. Can also be used for PLA, sure. The smooth Prusa sheet is really bad quality. I have much better smooth PEI’s than that, but they don’t fit, as the Prusa surface is a tad smaller.

Indeed. Never had issues with dirty sheets, because I keep a decent routine to maintain it from day one of 3D printing.

1 Like

This probably won’t fix your lemon but is an interesting read on caring for PEI print surfaces. @Pigjes

1 Like

Thanks. I am a chemist, among a few other degrees, so I know this too well. I still have my spare PEI’s from previous printers. I am amazed how different they are to the Prusa sheets, both textured and smooth. Both are the worst I have owned so far, but then I only had 3 brands of printers total and 1 brand of PEI I bought on Amazon because of its reviews.

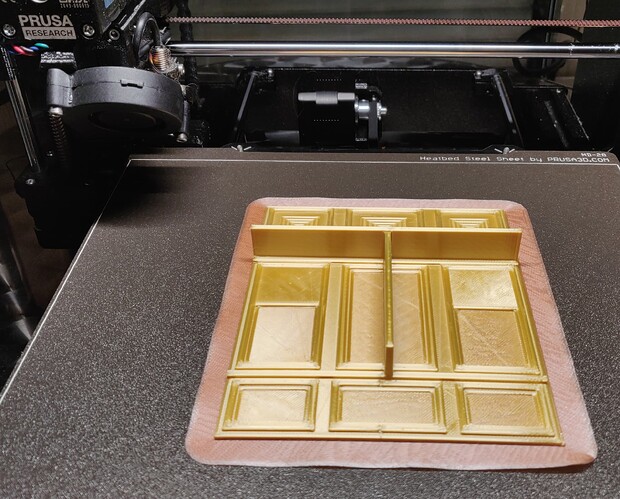
I am currently printing an old style doll shop I created in Tinkercad. I use Winkle Curcumin PLA, and a silk rainbow PLA. I use the silk PLA to lay down the bottom layers, so I can add Winkle on top. For the inside, I decided to use the silk PLA only.

4 designs made from 1 base design I created: a front, back, sides and back panel inside the shop.

First print: success. See it with the failed one below.

Second print started out great. I pass by in the kitchen where the printer is at and I see the last layers are made from far too wide wobbly lines on top of the rectangles, lines which should have been straight 1.5 layer height. And what did it do to the decent rectangles it already printed at the back and the one on the middle left???

Started over again and it printed decent.


Nearly forgot to take a pic, so done after I detached it. Can someone explain that? I never saw anything like that before!

From what I’ve read, posters in the Mk3+ facebook group state the smooth sheet is better for PLA. These posters claim they scuff the surface with steel wool, and then clean with dish soap and isopropyl alcohol, fwiw.

Regarding the latest pictures, I suggest looking into three areas: the filament, the extruder, and the hotend/heat break. Possibly all 3.

Silk filament is notorious for being tricky to print. I’d try printing the part out of orange Prusament or Hatchbox PLA.

In the picture, the extruder appears that it might be slipping. I’d take it apart and closely examine for defects (loose fitting, worn gears, accumulations of plastic dust. I have to periodically blow out the dust from my Bondtech BMG).

Lastly, the picture also suggest heat creep. I’d disassemble and reassemble the hotend, replace the nozzle (they are inexpensive), and possibly install a bimetal heat break.

An additional thought. The “chicken soup” fix for ailments of 3D printers is to slow down the print speed. See if the under extrusion exists at 1/2 current speed.

Cheers

P.S. – What does “which should have been straight 1.5 layer height” mean? What setting is this in PS?

1 Like