I recently got a NOCO Boost Plus GB40 (power bank to start cars) and while the device itself is great, the included storage and transportation bag is small and fiddly.
While thinking about a proper way to store the power bank within my car, I stumbled over a nice old soft case. I have no idea what it was used for or even what was even meant for originally.
The NOCO power bank and all components fit in perfectly, but soon revealed a small design flaw of the power bank. While all connectors are heavily shielded to prevent water to get into the device, there is nothing that prevents the device for being activated by accident. This would even happen to happen in the original bag. Probably even worst as the soft fabric does not stop any forces from pushing the power or light button.
I found a little bigger sized model for the bigger power bank on thingiverse, but it would not fit mine. It only showed that I wasn’t the only one noticing this design flaw.
So I designed my own using FreeCAD. It is very low profile and only takes a 15 minutes to print, but it does the job. A little rubber band around the power bank will keep it in place. Problem solved.
[ATTACH=JSON]{“data-align”:“none”,“data-size”:“medium”,“data-attachmentid”:16296}[/ATTACH]
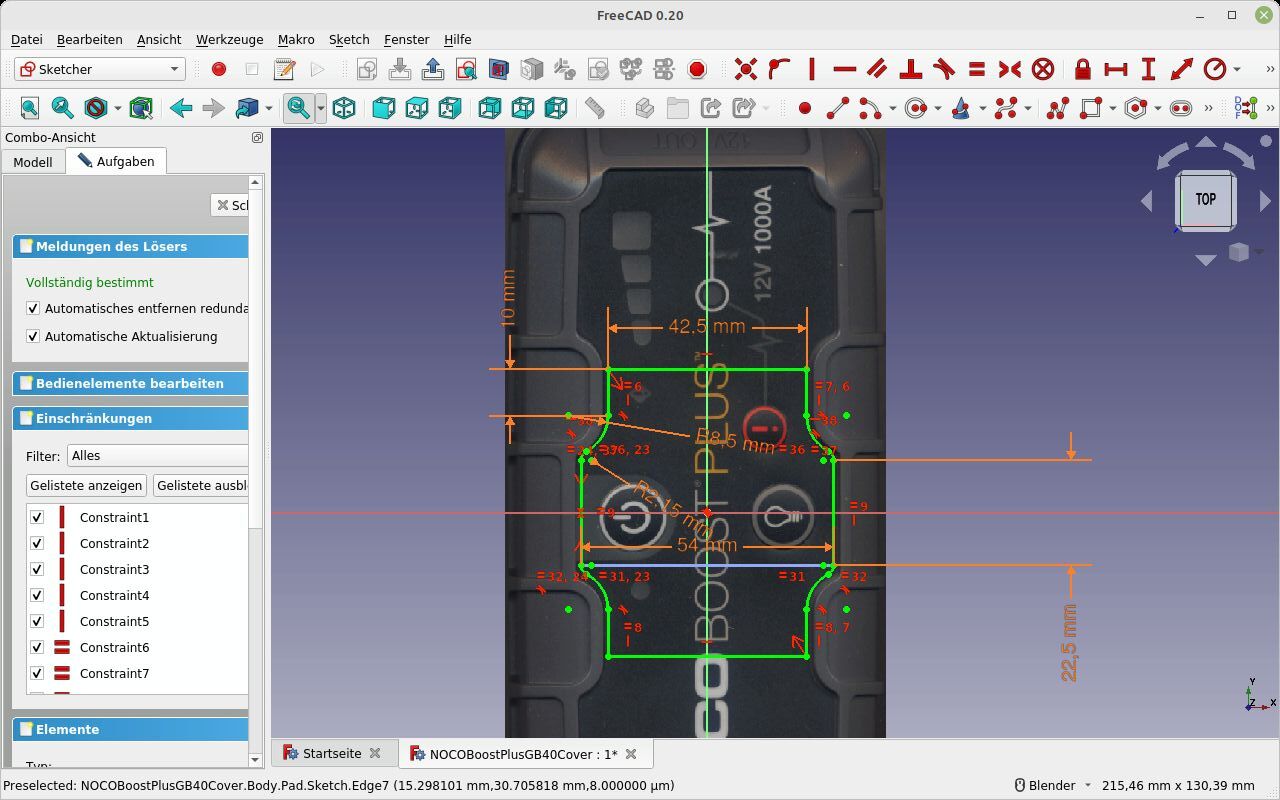
For the first time I used a the image workbench, which is very cool. You take a photo or even better you use a flat bed scanner to scan the original part.
A scanner is perfect as you do not get any distortion due to the perspective. The image workbench allows to load an image onto a specific plane, so it is even possible to load multiple images to different planes from all sides. In this case the top view was enough.
[ATTACH=JSON]{“data-align”:“none”,“data-size”:“medium”,“data-attachmentid”:16298}[/ATTACH]
After loading you take a specific distance of your object and specify this in FreeCAD by marking the same points you used in the real world to measure the distance. FreeCAD scales the image and now the image has the same size as the real world object you are designing and you basically sketch on top of the picture. which is very handy for shapes which aren’t just squares with 90° corners. It only took around 15 minutes to sketch and after printing it was a perfect fit.
[ATTACH=JSON]{“data-align”:“none”,“data-size”:“medium”,“data-attachmentid”:16299}[/ATTACH]
So after some time a new practical print of the week. ![]()
PS. I know I could create a clip on mechanism, but that would have take more time to design, more test prints to make it fit and probably would have gotten loose over time and usage. A simple U-shape would have worked, too as I use a bag, which would have pushed onto it and made it secure, but this is not a device I use every day. Look does not matter and fanciness can fire back here. If the bag is handled roughly such U-cover may break, the cover gets loose and when you need the device it is empty. So function over fanciness and look in this case.
[ATTACH=JSON]{“data-align”:“none”,“data-size”:“medium”,“data-attachmentid”:16300}[/ATTACH]
The cover was printed in ABS so it does not melt in the summer heat, when stored in the trunk of my car.