3d Printing Speed, Bowden vs Direct Extruder, Ender 3 v2 vs Upgraded Ender 5

Yes, that title is a mouthful.

3d printer speed is important to me as I often need to print multiple models for a particular video and I rarely have as much time as I would like.

Based on personal experience my fastest 3d printer is my Prusa i3 Mk3. Unfortunately, that printer is now at my son’s house, in another state, as I was running out of room and I wanted to have a printer to use with my grandsons. Back at the MakeWithTech lab, I have lots of printers to choose from and the faster one is my Monoprice Ultimate 2. Unfortunately, the Ultimate 2 has a relatively modest build volume.

I noticed a couple of common characteristics with the 3d printers I own that run the fastest reliably. They have rigid frames (the Ultimate 2 is fully enclosed) and they use direct extrusion. Unfortunately, the direct extruders on both of these printers are hard to work on. I was looking for an alternative.

Over the past 2 years, I have completed many upgrades to my Ender 5 that I purchased from Creality the day it was listed on their website. It has a SeeMeCNC EZR Struder Bowden style extruder I highly recommend, Capricorn Tubing, a Th3d EZABL, a Micro Swiss all-metal hot end, and a 32 bit Marlin 2 Th3d EZBoard Lite controller. Plus I have added a couple of 3d printed additions to further strengthen the frame. But since it has not been the shiniest printer in the lab the last 12 months it has seen limited use. It is time for me to take another look.

6 months ago I purchased a Micro Swiss Direct Drive Extruder for the Ender 5 and put it in a drawer. I came across it a couple of days ago while I was spending hours with my Artist-D Pro and thought maybe the Ender 5 with a Direct Drive Extruder could become my new extra reliable, high speed, day-to-day 3d printer.

I began working on this video with a timing test. Using Cura 4.11 and the standard Ender 5 profile that comes with Cura I did a test print. Cura estimated a print time of 2 hours and 1 minute. The actual print time was 2 hours and 4 minutes. This was great news because I could limit the number of test prints and use Cura to estimate the performance upgrades I would see with a direct extruder.

This morning I installed the new Micro Swiss Direct Extruder and much like their all-metal hot-end it is very well manufactured. What I didn’t realize, but should have because it is right on the box, is that I was also upgrading to a very robust dual gear extruder setup.

Here are some pictures while I do some more testing and film the video.

[ATTACH=JSON]{“data-align”:“none”,“data-size”:“custom”,“height”:“338”,“title”:“IMG_6577.jpeg”,“width”:“600”,“data-attachmentid”:11488}[/ATTACH]

[ATTACH=JSON]{“data-align”:“none”,“data-size”:“custom”,“height”:“338”,“title”:“IMG_6578.jpeg”,“width”:“600”,“data-attachmentid”:11489}[/ATTACH]

[ATTACH=JSON]{“data-align”:“none”,“data-size”:“custom”,“height”:“338”,“title”:“IMG_6579.jpeg”,“width”:“600”,“data-attachmentid”:11490}[/ATTACH]

The short length of Capricorn tubing shown in the video stops at the top of the heat break and does not enter the hot area.

The video should be out this week.
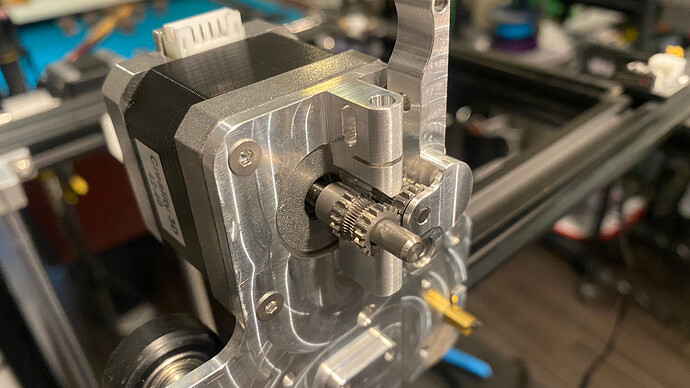
Thanks @Irv_Shapiro. In essence, this extruder setup looks remarkably similar to the direct drive mod I did on my Ender 5; surprisingly so. Of course, they used nicely machined, relatively thick aluminum while I was limited to 1/8" aluminum plate.

Despite the similarities, the part of these setups I like the least is the piece of Capricorn tubing. Ideally, I would love to have the extruder & hotend as close to each other as possible.

My experience with 3D printing to this point, & identifying what I consider sub-optimal features of various printers, are leading more & more to building my own printer. The D Bot printer, especially with some of the mods people have done, is looking more & more intriguing. Imagine a printer with these features: [LIST=1]

  • 300x300x350 to 400x400x400 volume;
  • linear rails on all axes;
  • uses either belts or 3 lead screws to raise & lower the printbed;
  • is CoreXY;
  • has interchangeable printheads;
  • is built from 2040 or even 4040 extrusion;
  • has a really thick, milled, stable bed;
  • is enclosed;
  • is IDEX
  • uses really light, direct drive extruder + hotend combos;
  • the clearance of each hotend can be adjusted using a fine-threaded knob on the extruder;
  • other features I can't think of at the moment. [/LIST]
  • @Ender5r Interesting list.

    I own a couple of fully enclosed printers and generally, they are painful to work on. I would want an enclosure that has snap-off sides with easy access to all of the components. I start from the point of view that every 3d printer will need maintenance and will break.

    I would add the following in no order:

    • It goes without saying it would be a 32-bit board with plenty of memory

    • internal fans to support PLA printing with enclosure closed and optional HEPA filter

    • native WIFI with good Octoprint integration. They would have to create an Octoprint plugging to connect over Internet protocols.

    • an internal well-positioned camera would be nice.

    • manufacturer-provided profiles for the major slicers.

    • Marlin V2 based with published source code for the port.

      • Front panel support for M117 commands (this is missing from the Ender 3v2)
      • Full support for M600 (change filament command standard in Marlin 2)
      • Manual position print head for leveling (available in Marlin 2)
      • Z offset wizard
      • Load filament front panel support
    • Paid options for vendor-provided remote access to the printer from a mobile app. This should be a profit center for the vendor.

    • Filament out detection that much like the artist-d is well before the extruder so it can properly pause the printer.

    • IDEX calibration wizards like those on the Flashforge Creator Pro 2.

    • Separate Z offset settings for each extruder.

    • Sells for under $1,000 (USD)

    I will probably edit this list as I think about it more.

    thanks @Irv_Shapiro, those a valuable points. I’m not sure I can build my ideal printer for $1,000, but I expect to end up with something that can run reliably & produce excellent prints with minimal downtime, hopefully for less than $1,500 & definitely less than $2,000.

    Very interesting lists. I wonder if such a complete set of desirable features will ever make it into a consumer/hobbyist level of 3D printer. My belief is only the engineering/industrial level of printers with their high price tags might in the foreseeable future have such a list of features. In other words, I think product price determines what features manufactures include in their products.

    As to Irv’s point about enclosed printers being hard to maintain, my Snapmaker 2 A350 has the optional enclosure kit that is not to hard to remove - remove 4 bolts, unplug 4 cables and the enclosure can be lifted off making maintenance much easier.

    The bad thing about the A350 with enclosure is the price $2,000+. Although it is a 3-in-1 (3D printer, CNC milling, laser etching) I only really use the 3D printing function.

    To do it for a ‘reasonable’ price, I think you have to build a printer like we’ve described as a DIY project. Assembly production lines are expensive. If you provide the facilities and labor the cost can be substantially reduced.

    @Ender5r I agree that manufacturing and assembly lines are expensive, until sufficient scale (sales) is reached to make the cost reasonable. I think there can be 2 issues with your DIY approach - 1) finding compatible components at reasonable prices; and 2) firmware. Individual parts are almost always higher cost that buying a complete machine or kit. As there will probably be several unique aspects of your DIY machine, you would probably need to write your own custom firmware to make the machine work correctly. Marlin is good and reasonably complete, but interfacing it with whatever control system is used and peculiarities of other parts employed could be tricky.

    In general the idea has merit, but I think the devil is in the details.

    @akc, yup, agreed. I would not incorporate anything that isn’t already working in other settings. For example, I would likely use a Duet WiFi board, which is well known, proven, has a strong support community, and is reliable. I would not incorporate anything that would require custom firmware. It might require tuning existing firmware by enabling or disabling features, and adding values to some feature (e.g. print bed size), but I would not be creating new custom code. Not that I don’t have the skills to do that – I just don’t relish the time to code and test that would be involved.

    And let’s not forget: with youtube and other channels, there are a ton of resources out there to help.