Oh dear, maybe that’s my issue with the Artist D – the smell of bananas makes me throw up… quickly.
@Irv_Shapiro, have you tried importing a Cura profile from a Creality printer to the Artist D? If so, you likely ran into the “Cannot import file” error. I did a little Interresearch today & found the answer (unfortunately, I closed the browser before getting the author’s name so I could credit them).
Anyway, it seems Cura profile exports are actually ZIP files. If you rename the file from .curaprofile to .zip you can then extract the 2 text files it contains. Edit both of these in your fave programmers’ editor (e.g. notepad or notepad++) & change the line that reads “quality_type = standard” to “quality_type = normal”. Now reZIP the 2 files (I created a new ZIP file). Then, rename the ZIP file from .zip to .curaprofile & import it Cura.
Apparently, Creality is using a deprecated definition. “Standard” used to be, ahem, standard, but now it’s normal.
The fun & games continue with the Artist D. Unfortunately, the extruder design is less than ideal. There is a pretty standard looking brass toothed wheel attached to the stepper motor shaft. So far, so good. Unfortunately, on the other side of the toothed wheel is not another toothed wheel, or even an idler wheel. Instead, JG Maker opted to have the filament rub up against a painted piece of curved metal.
IMHO, this is an issue. I think there is too much friction against the filament and it doesn’t feed quickly or evenly enough for good results. It’s pretty obvious when doing a extruder calibration test. As the extruder is trying to feed 100mm of filament, it can be seen that the filament is not feeding evenly & smoothly. Instead, the filament will move relatively quickly for a few millimeters, then it will practically stop, then start up again. The end result is uneven extrusion results, making it nearly impossible to get repeatable results.
The left extruder on my Artist D extrudes sort of OK on a setting of 493 steps/mm. That’s right: 493!!! To me, that’s ridiculous, but there it is.
The right extruder is much worse. Even at 1000 steps/mm it underextrudes. Crazy.
I have disassembled & reassembled the right extruder, which is how I found out about there being no idler wheel. I’ve done several cold pulls, to make sure the nozzle isn’t clogged. The filament does feed out, just way too slowly. The uneven feeding when doing a calibration test is worse than on the left extruder.
To ensure even comparison between the extruders I used the exact same spool of filament.
1 thing I neglected to do when I had the right extruder disassembled was to check that the toothed wheel is tightly secured to the stepper motor shaft. Maybe, just maybe, it’s a bit loose & that’s why it’s underextruding so badly.
More to come…
@Ender5r not sure if this is applicable, but there is a link in the tech support section of JGmaker’s website that might relate to the problem:
https://imgur.com/a/kKqG1t2?fbclid=IwAR2PcrkFA5ewtEWKMlAHRC5Ebw4P82chmS5hgiNT8KiAaUhL7Afl1CM04R0
It seems the part that pushes the filament against the brass stepper gear could be oversize and not slide freely.
@akc, thank you very much for the link. It’s very informative. Interestingly, there is at least 1 difference in the dissasembly of the Artist D shown in the article & my Artist D Pro. My Pro version does not have the 2 bolts with double lock washers shown in the article. Instead, it has 4 identical bolts holding the stepper motor to the extruder assembly. I believe the rest is the same, but I’ll find out when I go back in…
Thank you for the article. Are you still glad you bought it? I wonder if Irv is happy with his purchase.
Here are some pictures of the disassembled extruder on the Artist-D. My conclusion is the idler wheel is too small – or in fact, the component used as an idle wheel. (I could not get figure out how to remove the idler wheel but I think it is in there held by a screw. I have a photo below that makes it look like a wheel is in the opening opposite the space for the gear.)
Most extruders with single gears have idler wheels that are about the same size as the gear. This one is much smaller. In addition, it does seems to be too far recessed into the metal assembly to be effective so in effect the filament might be rubbing on the metal assembly.
[ATTACH=JSON]{“data-align”:“none”,“data-size”:“custom”,“height”:“338”,“title”:“IMG_6558.jpeg”,“width”:“600”,“data-attachmentid”:11451}[/ATTACH]
[ATTACH=JSON]{“data-align”:“none”,“data-size”:“custom”,“height”:“338”,“title”:“IMG_6556.jpeg”,“width”:“600”,“data-attachmentid”:11452}[/ATTACH]
[ATTACH=JSON]{“data-align”:“none”,“data-size”:“custom”,“height”:“337”,“title”:“artist idle wheel.jpg”,“width”:“600”,“data-attachmentid”:11453}[/ATTACH]
You can just barely see the silver idler wheel in this photo. I could not figure out how to get the center component out, so I could not see how the screw – you can see the end of the screw holds the idle wheel.
Since I did not get it out it may in fact not be a rotating idle wheel but might be a piece of metal that is fixed.


[SIZE=18px]MAJOR UPDATE
1st, right off the top, I have to apologize to JG Maker. I was quite mistaken about the design & manufacturing quality of the extruder, at least the Pro version. So, JG Maker, picture me prostrate on the ground at your feet, begging your forgiveness.
Now, what did I learn today? In a word, a lot.[/SIZE] [LIST=1]
		[IMG2=JSON]{"data-align":"none","data-size":"full","height":"388","width":"517","src":"https:\/\/i.imgur.com\/GcpV8oE.jpeg"}[/IMG2]
		.
		One thing to note @irv : the bearing is actually fairly large. I believe it is as large as the toothed wheel. And, when you take the machine bolt out from the center of the bearing, you will find that there is a black sleeve bearing inside the hole in the bearing, so the bolt doesn’t ride up directly against the bearing hole, a really nice touch IMHO. And, the sleeve bearing is lubricated.

		Another thing to note: the quality of the machining. It’s much better than I expected. It appears the parts were milled on a CNC machine, so more kudos to JG Maker.
		.     @irv, a tip on removing the sliding bearing ‘plate’. If you look really closely you will see the white PTFE tubing that comes in from the Bowden coupler actually comes really, really close to the opening through which you can see the edge of the bearing. In fact, the piece of white PTFE tubing is preventing you from removing the bearing plate. Pull the tubing out & you should be good to go. Also, you have to ensure you have the nozzle removed, because the PTFE tubing in the nozzle interferes with getting the bearing plate out as well.
		.     I was pleasantly surprised to make this discovery. To me, because the PTFE tubing comes so close to the opening where the ball bearing comes into play, it means the extruder should be able to handle pretty darn flexible filaments (can you say NinjaFlex?). There is almost nowhere that the filament can squeeze out of the intended path. Again, more kudos to JG Maker.
		.
[/LIST]
[/LIST]
@Ender5r I think your solution is great thinking, but indicates a major bug in JGMaker’s firmware. You should report the bug to JGMaker - hopefully they will fix it.
I’m running the TwinkieXLII 2.3.3 firmware. That said, JG Maker itself links to that firmware on github, so it’s not like it’s unapproved.
[SIZE=18px]OK folks, time for a reset. In fact, that’s what I did today. Last night I was thinking about this whole mess. It struck me that I did get some not perfect, but still pretty decent prints from the Artist D Pro when I first set it up. I was also able to calibrate it, which seems to not be possible right now.
So, I decided to go back to basics. IOW, start over from scratch.
I used the menu system to Reset To Factory Defaults. Then I loaded up the original 2.0.5.3 firmware from JG Maker.
I didn’t even bother to try to calibrate extrusion. I went right to leveling the bed. That’s when the 1st snafu came up.
When I used the Bed Leveling option to try to level the left extruder to the center point of the bed I ran into 2 issues:[/SIZE] [LIST=1]
On to printing 20x20mm squares. The 1st one actually printed pretty nicely. I felt it was just a little rough (meaning the head was a tad too close), so I adjusted the Z Stop a tiny bit. The 2nd print was really good.
That’s when something hit me. For kicks, I checked the clearance of the nozzle after making the previous adjustment. What I found was that it was the thickness of a standard sheet of photocopy paper folder over once. IOW, a double thickness. I checked the thickness of the paper with my calipers: 0.1mm. The clearance that worked really well was 2 layers of paper: i.e. 0.2mm. Wait a sec, 0.2mm is exactly the same as the layer height I specified in Cura. I measured the 20x20mm square – 0.2mm.
That’s when I had another revelation. I have been following the advice to set the nozzle clearance height by using a Post-It note or a sheet of paper, regardless of what layer height I was specifying in the slicer. I suddenly realized that that doesn’t make sense. Shouldn’t the nozzle clearance be based on the desired layer height? In fact, shouldn’t it be the same as the specified layer height? IOW, if you want to print 0.2mm layers, set the nozzle clearance to 0.2mm. If you want 0.12mm thick layers, set the nozzle clearance to 0.12mm. I have not fully tested this hypothesis yet, but I think it makes logical sense.
At this point, I have not calibrated the extruder, and the Flow Rate is back to 100%. I’m using the quality of the 20x20mm test squares to judge the extrusion rate and nozzle clearance. I actually feel this makes sense. After all, the object is to get good prints. If the squares are good doesn’t that, by definition, mean the extrusion rate/flow rate and clearance are OK?
This brings me to 1 of my main bugbears with the Artist D. They really need to redesign at least the right-hand extruder mounting system. At the moment, setting the nozzle clearance is excrutiating. What I want to see is to have the extruder+hotend mounted to a vertically sliding plate that can be adjusted up and down using a fine-threaded bolt with an adjustment knob on top. The current plate does slide up and down, but it has to be locked into position from the rear using 4 bolts. Naturally, tightening and loosening these 4 bolts leads to slop that affects the nozzle clearance, so there’s a lot of guesswork. It’s tedious and takes a lonnnng time. Really not nice. Ideally, both extruders should have this feature. It would make it so much easier to dial in the nozzle clearance. [/SIZE]@Irv_Shapiro, if you’re talking to the JG Maker folks, please bring this up.
Do you have any contact with the manufacturers of this printer? Do they give any feedback?
I don’t, but in this post [U]http://forum.makewithtech.com/forum/idex-multi-material-3d-printers-aa/11449-update-about-the-jg-maker-artist-d-pro?p=11486#post11486[/U] @irvshapiro1 mentions he has an active dialogue going on with JG Maker Support.
Yet another major discovery regarding the Artist D. I couldn’t figure out why it was SOO hard to push filament through the left extruder by hand. It was almost impossible to do. So, I tried the right extruder. SOO much easier. Why?
I took the left extruder apart and inspected all the bits. No issues. Hmm. Took the left extruder apart again and, again, no issues. I compared the nozzles. They’re different. That’s because I was using 1 of JG’s new so-called Optimized All-Metal Nozzles. I had been hoping they would allow me to use higher temps and therefor be able to print faster. But, I ran into heat creep with the new nozzles. They would print fine for the 1st 20 layers or so (depending on the size of model) then the nozzle would start clogging up, leading to extreme under extrusion.
I swapped the nozzles in the hotend, re-trammed/levelled the bed, and printed a very nice 20x20 mm square. Did a little more work, re-trammed/levelled once more, and I’m now printing a silica gel canister. So far, so good.
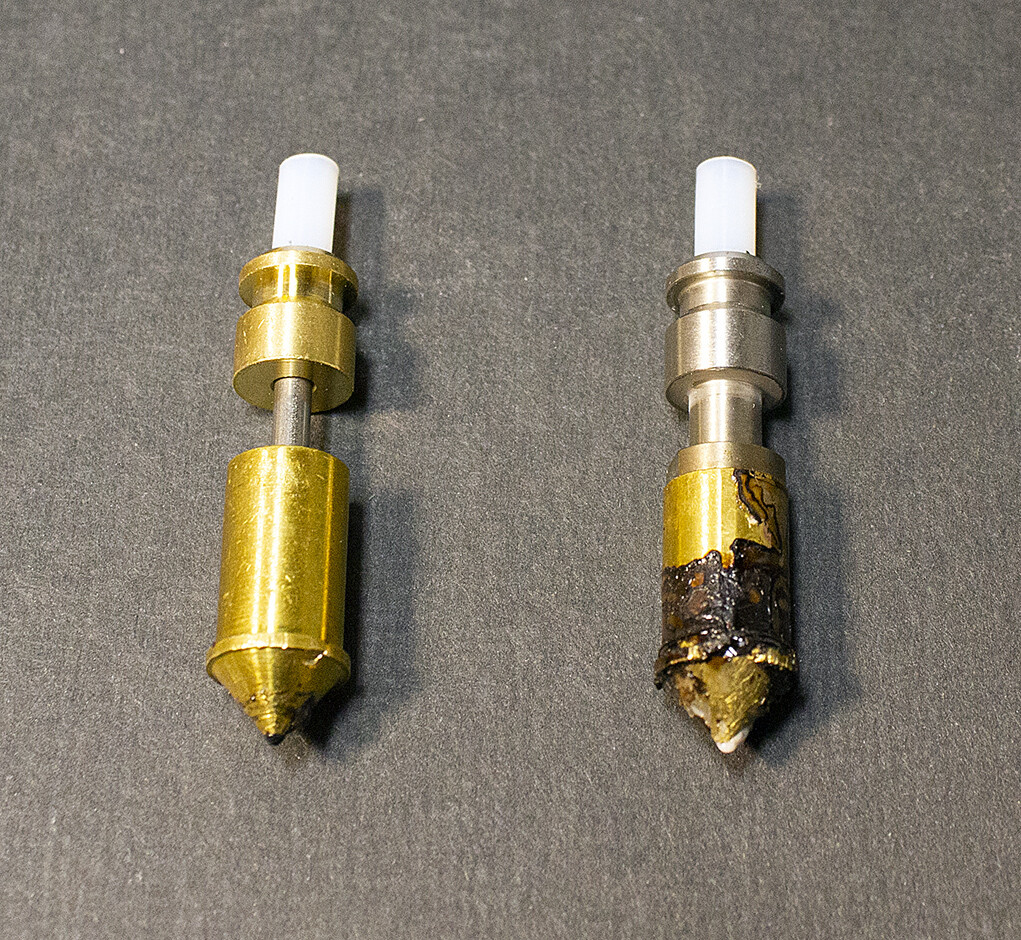
Bottom line: I cannot recommend JG’s all-metal nozzles. Buy at your own risk.
[ATTACH=JSON]{“data-align”:“none”,“data-size”:“custom”,“height”:“357”,“width”:“388”,“data-attachmentid”:12995}[/ATTACH]
left: all-metal nozzle
right: regular nozzle
It’s been a while since I updated this thread. First, a few links to related posts in other threads:
http://forum.makewithtech.com/forum/registered-users-only/13362-looking-at-larger-printer?p=13379#post13379 and the posts following.
Today, taking a hint from Lowteck's post in the link above, I tried extruding some PLA filament. This didn’t go too well at first. It was a little better than with PETG, but not a lot. It was still erratic.
Then I had a brain fart. I wondered how I could easily apply more pressure to the filament. I looked around and settled on this:
[ATTACH=JSON]{“data-align”:“none”,“data-size”:“medium”,“data-attachmentid”:13445}[/ATTACH]
What I did was slide the nut slot behind the knob that releases the filament pressure slide. I used Pronterface to tell the printer to extrude 100 mm of PLA. While it was extruding I used the wrench to pull the pressure knob away from the extruder housing. The difference was immediate. The filament flowed out much quicker and much more smoothly. Needless to say, this result was encouraging.
The next was to find a way to exert more pressure without having to use a wrench. I looked in my boxes of bits and pieces. I took the spring and endcap from the original Ender 5 extruder. I coupled that with an M3 bolt just slightly shorter than the spring, plus a flat washer. I positioned them against the sheet metal extruder housing and screwed the bolt into the pressure slide, thus:
[ATTACH=JSON]{“data-align”:“none”,“data-size”:“medium”,“data-attachmentid”:13446}[/ATTACH]
For PLA, this worked almost perfectly. I was able to reliably extrude PLA @ 220C with no extruder chirping. This is 10C to 20C higher than I normally expect, but it worked, and it is in line with observations made by others around the world.
For PETG, it didn’t work. The extruding was better than it had been but, even at 244C, I got extruder chirping. Unfortunately, the current firmware will only allow the hotend to go to 244C. I suspect it might work a lot better @ 250C. Maybe I need to look into using Klipper on the Artist D.

